

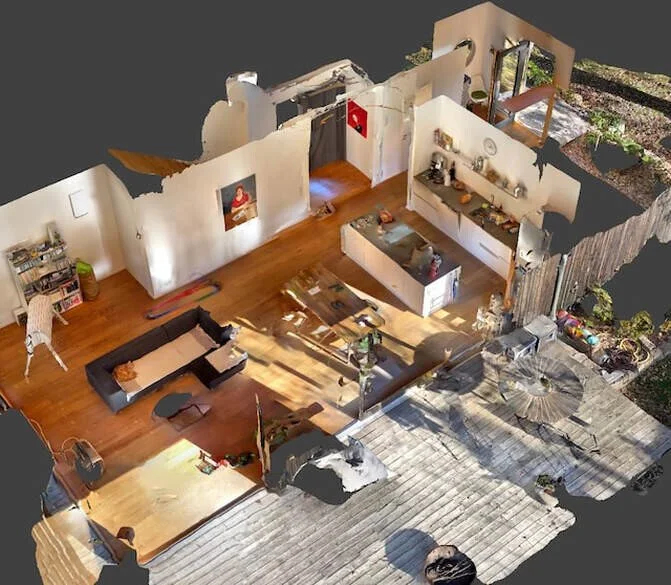
A point cloud model of a residential home.
Accurate Loop-Closure Using Dot3D for iOS. A Comparative Study.
Introduction
Surveyors and 3D Capture professionals know about the critical importance of "closing the loop" when scanning a site. Loop closure is the process of identifying the parts of a continuous scan that were captured more than once and using the resulting identities to eliminate error from the scan.
Loop closure in SLAM and 3D Reconstruction systems is often regarded as a "solved" problem by academics, which it is -- in theory. However, as we'll show, the reality is that it is still a tricky problem to solve in the general setting with many side-cases, and fully-automatic and scalable solutions are particularly hard.
Dot3D's core engine was designed to solve exactly this problem. This capability has been getting great reviews from our customers but we decided to put it to the test ourselves to get some hard data on how it compares.
In this test, we used an iPhone Pro with integrated LiDAR camera to 3D-scan a home using 10 different apps, including Dot3D for iOS, and analyzed the results. To download the mesh / point cloud results, click here.
We show the "SLAM errors" and artefacts (misalignments, double geometry, ghosting, holes, etc) produced by most apps and also get into detail how they emerge and how Dot3D is able to solve it.
The Problem: Drift
Let’s say you'd like to digitize a home with your new iPhone Pro, using the embedded 3D LiDAR scanner.
Perhaps the apartment has several rooms and a patio, is about 100 m2 (~1000 sq ft) in size, and you’re planning to capture the full place with a single handheld 3D scan.
You start the scan in a corner of the main room, then make your way around the space to cover the floor and walls, into the other rooms, outside to the patio and back in. You make sure you capture the entirety of the space and leave no holes before finishing.

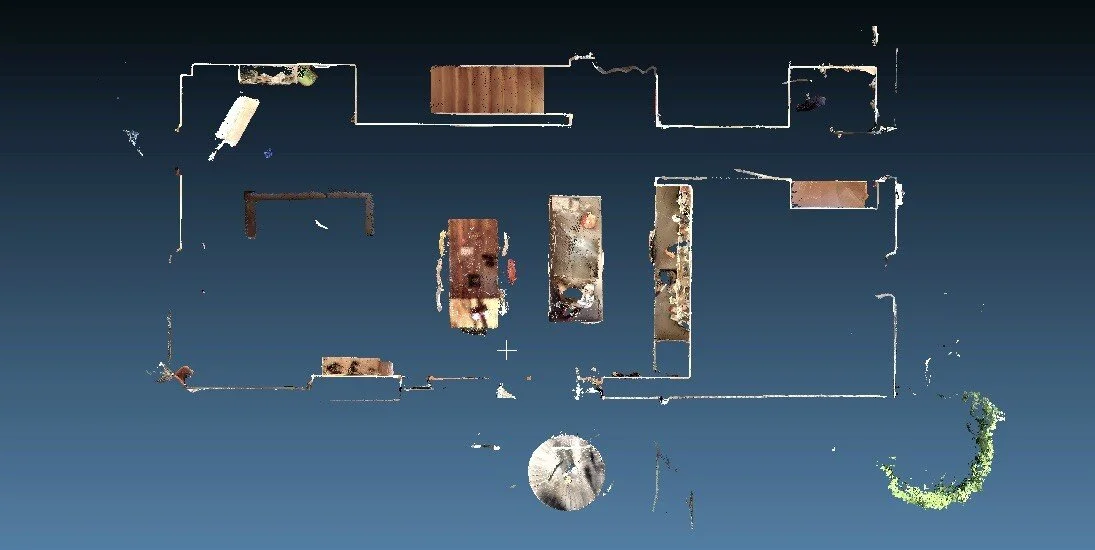
Figure 1: Top-down view of the space captured and the path taken through it
However, after you wrap up and let the app complete the optimization of the data, you notice an issue: there are areas in the scan where the walls are doubled or scrambled, floors have weird steps that aren't there in reality or there are holes in the data.
Confused as to what happened and if it may have been user error, you try to scan the place again – but with similar results. Then you try to take a different route through your scene during the scan – but it doesn't resolve the issues, it just shifts them to different places in the scan.
Maybe then you try to scan smaller sections at a time that look consistent and then piece them together in the office on your desktop PC -- only to find out that there's always gaps and errors, no matter how you arrange the pieces.
Whatever you try, there just doesn't seem to be a way to get a consistent, trustworthy model of the space that you'd like to digitize! Welcome to the world of SLAM (simultaneous localization and mapping).
Let's drill down on what happens under the hood...
(Of course, home scanning is just one example. In reality this problem shows up in many other kinds of scan environments: AEC, facilities, landscaping, public safety, forensics, utilities, ships, and many more)

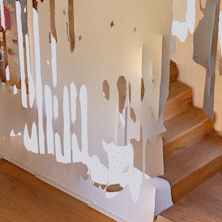
SLAM Artefact: A scrambled wall
Why do most apps fail to generate good scans?
Handheld scanning apps create a map of the scene incrementally or "frame-by-frame" as you walk around. It's a fundamental constraint since the entire space can never be visible from one viewpoint only. So as you explore, more scan data is added to the 3D map.
Now, in order to build the 3D map and add new data to the correct spots, your phone needs to continuously self-localize in 3D space (i.e. determine "where am I and where am I looking at"). This is what's called SLAM (simultaneous localization and mapping) problem in the robotics / computer vision community.
And here is where it gets interesting: to be usable for 3D scanning this localization needs to be very precise, much more precise than what a GPS could provide (if that is even available).
To solve this the phone is using its own sensory input (camera, inertial sensors, LiDAR) together with the 3D map that's already been built, and feeds everything into its own internal localization engine. The output of this is a very precise estimate of pose (location and orientation of the phone in space).
However, these pose estimates come with a big caveat: They are not global (with respect to an external coordinate frame) but relative to their local environment. The pose you get for one frame builds on the poses and 3D map you had in the previous frames.
As you may expect, this form of self-localization eventually leads to drift, because each pose estimate (while really precise) still has a small amount of error and that error accumulates the larger your scan becomes.
Eventually in your scan you may return to a spot you have covered before, but due to the self-localization drift your phone's pose estimate will be off from when you first scanned the area. And because of this mis-localization, data is added in the wrong places in the 3D map, leading to inconsistent / angled / scrambled / doubled and generally untrustworthy scanning results.
This is called a Loop Closure and the way apps are handling it is the most important contributor to final scan accuracy for any non-trivial scan sizes.

An improperly handled loop closure: localization drift causes the later (right) part of the scan to be misaligned against the earlier (left) part.
It should be noted that the eventual mis-localization of the device is inherent to the methodology and cannot be avoided. Even if the device was able to correctly re-recognize places that it’s been before during the scan and subsequently re-localized, it would introduce a break in the device trajectory and cause a corresponding break/inconsistency in the scan data that way.
Let's explore how we can find a way out of this maze then...
How can the problem be solved then?
To solve this conundrum a 3D scan optimization process has to take a holistic view of the data. Instead of optimizing poses and data locally (and breaking the data in another place) it considers all pieces of recorded data at once in a joint global optimization. The output of such an optimization are corrective terms that put all the data points in the right spot, such that surface errors are minimized.
It is important to note that this global optimization has two objectives:
Eliminate the gaps/errors that arise where loops are closed.
Keep all the surfaces and textures in the scene smooth, consistent and continuous (i.e. "don't break anything").
These two objectives are often at odds with each other, which is why it is highly nontrivial. Fortunately though, through years of battle-testing, Dot3D's core engine has become really good at solving this problem. Here's a quick overview:
At a very high level, it is all about attributing drift error. The error is always there but only becomes apparent when a loop is closed. When that happens we get a chance to quantify the error, assuming we can accurately identify corresponding parts.
With the error quantified and using the complete scan and sensory data we can then estimate which spots the error likely originated from and how it accumulated, so we can systematically remove it from the scan. This is the stage of error attribution.
With the drift error removed we can then take our scan data and extract a common surface and colorize it using a different kind of optimization algorithm.
Optimized scene with properly handled loop closure (Dot3D). Top-down view cross section.
A note on meshing
Many apps also "mesh" the data as part of the processing after capturing, i.e. they convert the raw 3D point cloud and images into a textured surface of triangles (which, for certain use cases is a superior representation to the raw point cloud).
However, doing meshing before properly handling loop closures often exacerbates the artifacts. This is because meshing algorithms always try to create a smooth and consistent surface from the input. If there's gross ambiguity about where the surface is actually located they are very much helpless and often produce additional artefacts.
Meshing before proper loop closure
Let's look at the data then
We tested ten different 3D scanning apps on an iPhone Pro 12. All tests were carried out on Nov 13th, 2022 with the then-current versions of the respective apps.
In fairness towards the app developers we only identify Dot3D by name and keep the other apps anonymous.
All of the tested apps have meshes or point-clouds as primary output. No NeRF apps could be tested as the scanned scene size exceeded their limits. (As some of the NeRF apps now also allow a video upload as input we may at some point test again and add those results as well.)
Four of the ten tested apps ran out of memory during scanning or crashed (reproducibly) during scanning. Broadly speaking, none of the more popular scanning apps was among those four. Another one of the tested apps produced output of such poor quality that we decided to not include it.
The remaining five were tested as follows: for each test we took the same scanning path through the scene and created an area of overlap in the start/finish area of the scan (see Figure 1 above). Since the scans were carried out manually some small deviations in the actual trajectories remained, so we did each scan two times and picked the better result.
No tags, targets, fiducials or other designated visual elements were used in the scans.
All testing results can be downloaded here.
Results: Dot3D
Dot3D was the only tested app that managed to globally optimize the scene with correctly handled loop closures and virtually no artefacts. The images below show the results and similar images are used for the results from the other apps.
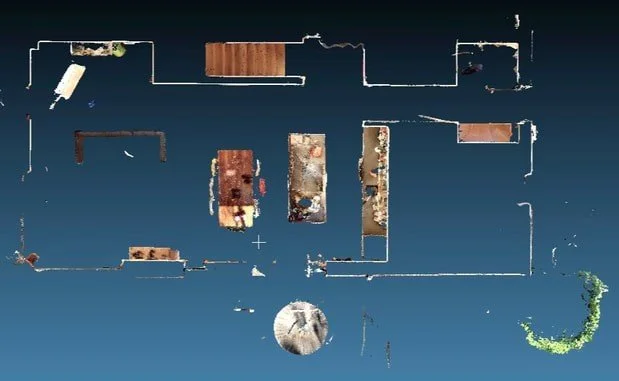
Top-down cross section of the optimized scene. Point cloud rendering.

View of the entire scanned scene in Dot3D. Point cloud rendering.

Close-ups of the kitchen and loop-closure area. Point cloud renderings.
Results: App #2
This is a popular scanning app on the App Store®. The scene was optimized with the app's "loop closure" option enabled in the optimization settings.
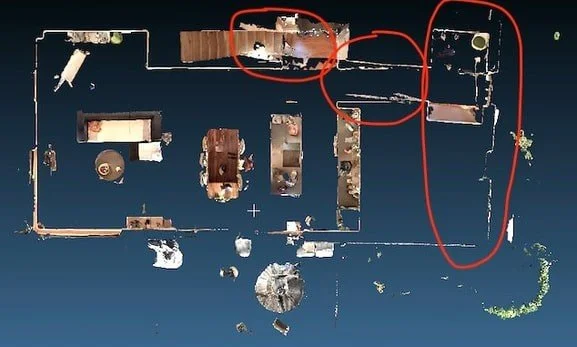
The results are showing substantial artefacts and misalignment around the loop-closing area, in particular around the entrance/hallway and the area around the stairs which are both angled against the rest of the scene.
Other areas of the scene look better, although not free of artefacts either. We notice meshing and texturing artefacts in particular.

Cross section of optimized scene. Misalignments in the entrance and stairs area (highlighted). Mesh rendering.

View of the scene in the app. Textured mesh rendering.

Left: Close-up of the entrance area showing artefacts. Right: blueprint visualization showing misalignment.
Results: App #3
Another popular scanning app. This app offers a LiDAR Standard and a LiDAR Advanced mode, which we both tested.
In our testing we only found the results from the LiDAR Advanced mode good enough for analysis. However they still contained many artefacts: The loop does not get closed properly which is very visible in the entrance area and hallway being at an angle vs the beginning of the scan. There is a large piece of phantom geometry in the stairs area as well as mis-texturing in the overlapping area.
We did not find the results from the "LiDAR Standard" mode usable.
LiDAR Advanced Mode:
Cross-section of the optimized scene. Drift caused the right part to be angled. App could not close the loop.

A blueprint of the same scene, extracted through the app's own algorithms.

Left: phantom geometry. Top: double ceiling. Bottom: double floor. Right: misalignment.

View of the scene in the app. Textured mesh rendering.

Close-ups: Left: artefacts and mis-texturing in the overlap area. Right: a tear/step in the floor.
LiDAR Standard Mode:

Many holes and mis-texturing in LiDAR Standard Mode. Data not usable.
Results: App #4
This app is also quite popular on the App Store®. The scene was optimized using the app's "Area" setting.
There are noticeable loop-closing artefacts in the overlap area around the stairs and in the entrance hallway. We also noticed a step in the floor in the kitchen area and a doubled ceiling.
The remainder of the scene looks relatively crisp and accurate.

Top-down cross-section with artefacts highlighted.

Vertical cross-section with artefacts highlighted: Double floor, double ceiling and double wall.
View of the scene in the app. Textured mesh rendering.
Results: App #5
Less popular than the previous apps (but still highly rated), this app also produced substantial artefacts around the overlap / loop closure area, as well as in other parts of the scene.
The scene was optimized using the app's "Pro" setting.

Scene in top-down cross-section. Left and center: Double walls and ghost geometry. Right part: angled vs. the rest of the scene.

View of the scene in the app. Textured mesh rendering.

Left: double walls and ghost geometry artefacts in the loop closure area. Right: ghost geometry on the patio.
Conclusion
We explored the types of artefacts that can be caused by improperly handled loop closures and the techniques used for mapping, localization and scene optimization. We then tested various iPhone scanning apps for their ability to properly handle loop closures.
Out of ten tested iOS 3D Capturing apps, only Dot3D was able to properly handle a loop closure in a typical scan of a residential space.
We find that properly optimising loop closures is key to obtain accurate, trustworthy results.
All scan results can be downloaded here.